| conf-generator | ||
| docs | ||
| tor | ||
| .env | ||
| castor.sh | ||
| docker-compose.yml | ||
| README.md | ||
CasTor 🦫
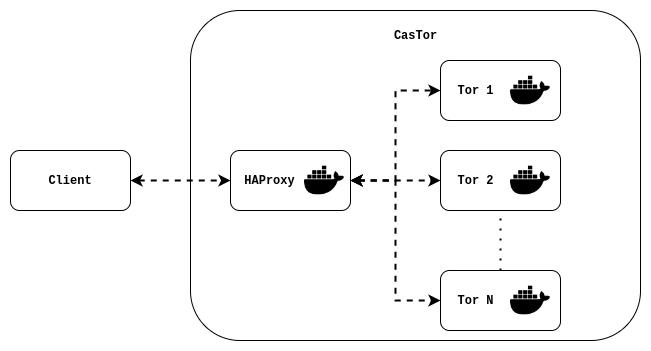
Tor proxy with balanced Tor instances.
Requirements
Usage
There are two ways to launch castor proxy:
-
you can either use the castor script: Castor script
-
or use dirrectly docker commands: Docker compose
Castor script
The script castor.sh can be used to start the castor proxy.
Quickstart
Start a SOCKS5 proxy on port 8080:
bash castor.sh start
Stop the proxy:
bash castor.sh stop
Usage
Usage: castor.sh [OPTIONS] COMMAND

COMMANDS
    start
        starts castor
    stop
        stop castor

OPTIONS
    -h
        Display usage statement
    -p=int
        Port to run the proxy (default=8080)
    -m=socks|http
        Proxy mode, either SOCKS5 or HTTP CONNECT proxy (default=socks)
    -t=int
        Number of Tor instances to run (default=5)
Simplify script usage
Set an alias
To simplify the use of this script and simply call it with castor, you can set an alias such as (assuming you are in castor directory):
alias castor='bash $(pwd)/castor.sh'
This alias should be written in the ~/.bashrc file to make it permanent:
echo "alias castor='bash $(pwd)/castor.sh'" >> ~/.bashrc
Add autocompletion
Once you setted an alias for the castor script, you can also add autocompletion for castor commands:
complete -W "start stop" castor
Once again to make the autocompletion permanent, you should add it in the ~/.bashrc file:
echo "complete -W 'start stop' castor" >> ~/.bashrc
Simplified script usage
After setting an alias and autocompletion, the script can be used from anywhere simply as following:
castor [OPTIONS] COMMAND
For instance to start the proxy on port 1234 with 15 Tor instances:
castor -p 1234 -t 15 start
Docker
The castor script simply calls docker-compose commands, so you can use docker-compose directly.
Quickstart
This command will start 5 Tor instance and HAProxy:
docker-compose up
By default the proxy will be a SOCKS5 proxy running on port 8080 (as specified in .env file).
Start multiple Tor instances
Use the docker-compose scale option to set the number of Tor instance to start
For instance to start 10 Tor instances:
docker-compose up --scale tor=10
By default, 5 tor instances are started. This also can be tunned in docker-compose.yml file by editing the scale parameter of tor service.
Use HTTP CONNECT proxy
Tor also provides an HTTP CONNECT proxy; you can use it by setting the environment variable PROXY_MODE to "http". This can be done by editing the .env file or dirrectly in the shell such as:
export PROXY_MODE="http"
Run proxy on a different port
Proxy port can be set using the environement varaible PROXY_PORT. You can specify it in the .env file or dirrectly in the shell such as:
export PROXY_PORT=8080
Test the proxy
Once the application is started, you can test your proxy with curl:
# test without the proxy
$ curl https://ipinfo.io/ip
A.B.C.D     # => your current IP address

# test with the proxy (with the default proxy conf)
$ curl -x socks5://localhost:8080 https://ipinfo.io/ip
W.X.Y.Z     # => Tor exit node IP address
How is it working ?
When you run the command docker-compose up, you start at least 3 services (more if you scaled up the number of Tor instances): tor, conf-generator and haproxy.
-
The first service started is tor, this service is running a Tor instance with a SOCKS5 proxy (and with a Tor HTTP Tunnel if you use the "http" mode).
-
The second service is conf-generator, this service runs a python script that does the following things:
- get all the IP address of the Tor instances within the docker network (using the Docker API)
- generate an HAProxy configuration file with the retrieved IPs and the proxy mode
-
The final service is an HAProxy load balancer using the configuration file generated by conf-generator.
