|
|
3 months ago | |
|---|---|---|
| .circleci | 3 months ago | |
| .github | 5 months ago | |
| assets | 3 months ago | |
| dockerfiles | 2 years ago | |
| docs | 9 months ago | |
| documents | 8 months ago | |
| examples | 2 years ago | |
| src | 3 months ago | |
| xterm | 1 year ago | |
| .gitignore | 4 months ago | |
| .npmrc | 9 months ago | |
| LICENSE.txt | 2 years ago | |
| README.md | 3 months ago | |
| config_github_terminal.js | 9 months ago | |
| config_public_alpine.js | 4 months ago | |
| config_public_terminal.js | 9 months ago | |
| favicon.ico | 2 years ago | |
| login.html | 2 years ago | |
| nginx.conf | 7 months ago | |
| package-lock.json | 3 months ago | |
| package.json | 4 months ago | |
| postcss.config.js | 4 months ago | |
| scrollbar.css | 2 years ago | |
| serviceWorker.js | 2 years ago | |
| svelte.config.js | 9 months ago | |
| tailwind.config.js | 9 months ago | |
| tower.ico | 2 years ago | |
| vite.config.js | 8 months ago |
README.md
WebVM
This repository hosts the source code for https://webvm.io, a Linux virtual machine that runs in your browser.
Try out the new Alpine / Xorg / i3 graphical environment: https://webvm.io/alpine.html
WebVM is a server-less virtual environment running fully client-side in HTML5/WebAssembly. It's designed to be Linux ABI-compatible. It runs an unmodified Debian distribution including many native development toolchains.
WebVM is powered by the CheerpX virtualization engine, and enables safe, sandboxed client-side execution of x86 binaries on any browser. CheerpX includes an x86-to-WebAssembly JIT compiler, a virtual block-based file system, and a Linux syscall emulator.
Enable networking
Modern browsers do not provide APIs to directly use TCP or UDP. WebVM provides networking support by integrating with Tailscale, a VPN network that supports WebSockets as a transport layer.
- Open the "Networking" panel from the side-bar
- Click "Connect to Tailscale" from the panel
- Log in to Tailscale (create an account if you don't have one)
- Click "Connect" when prompted by Tailscale
- If you are unfamiliar with Tailscale or would like additional information see WebVM and Tailscale.
Fork, deploy, customize
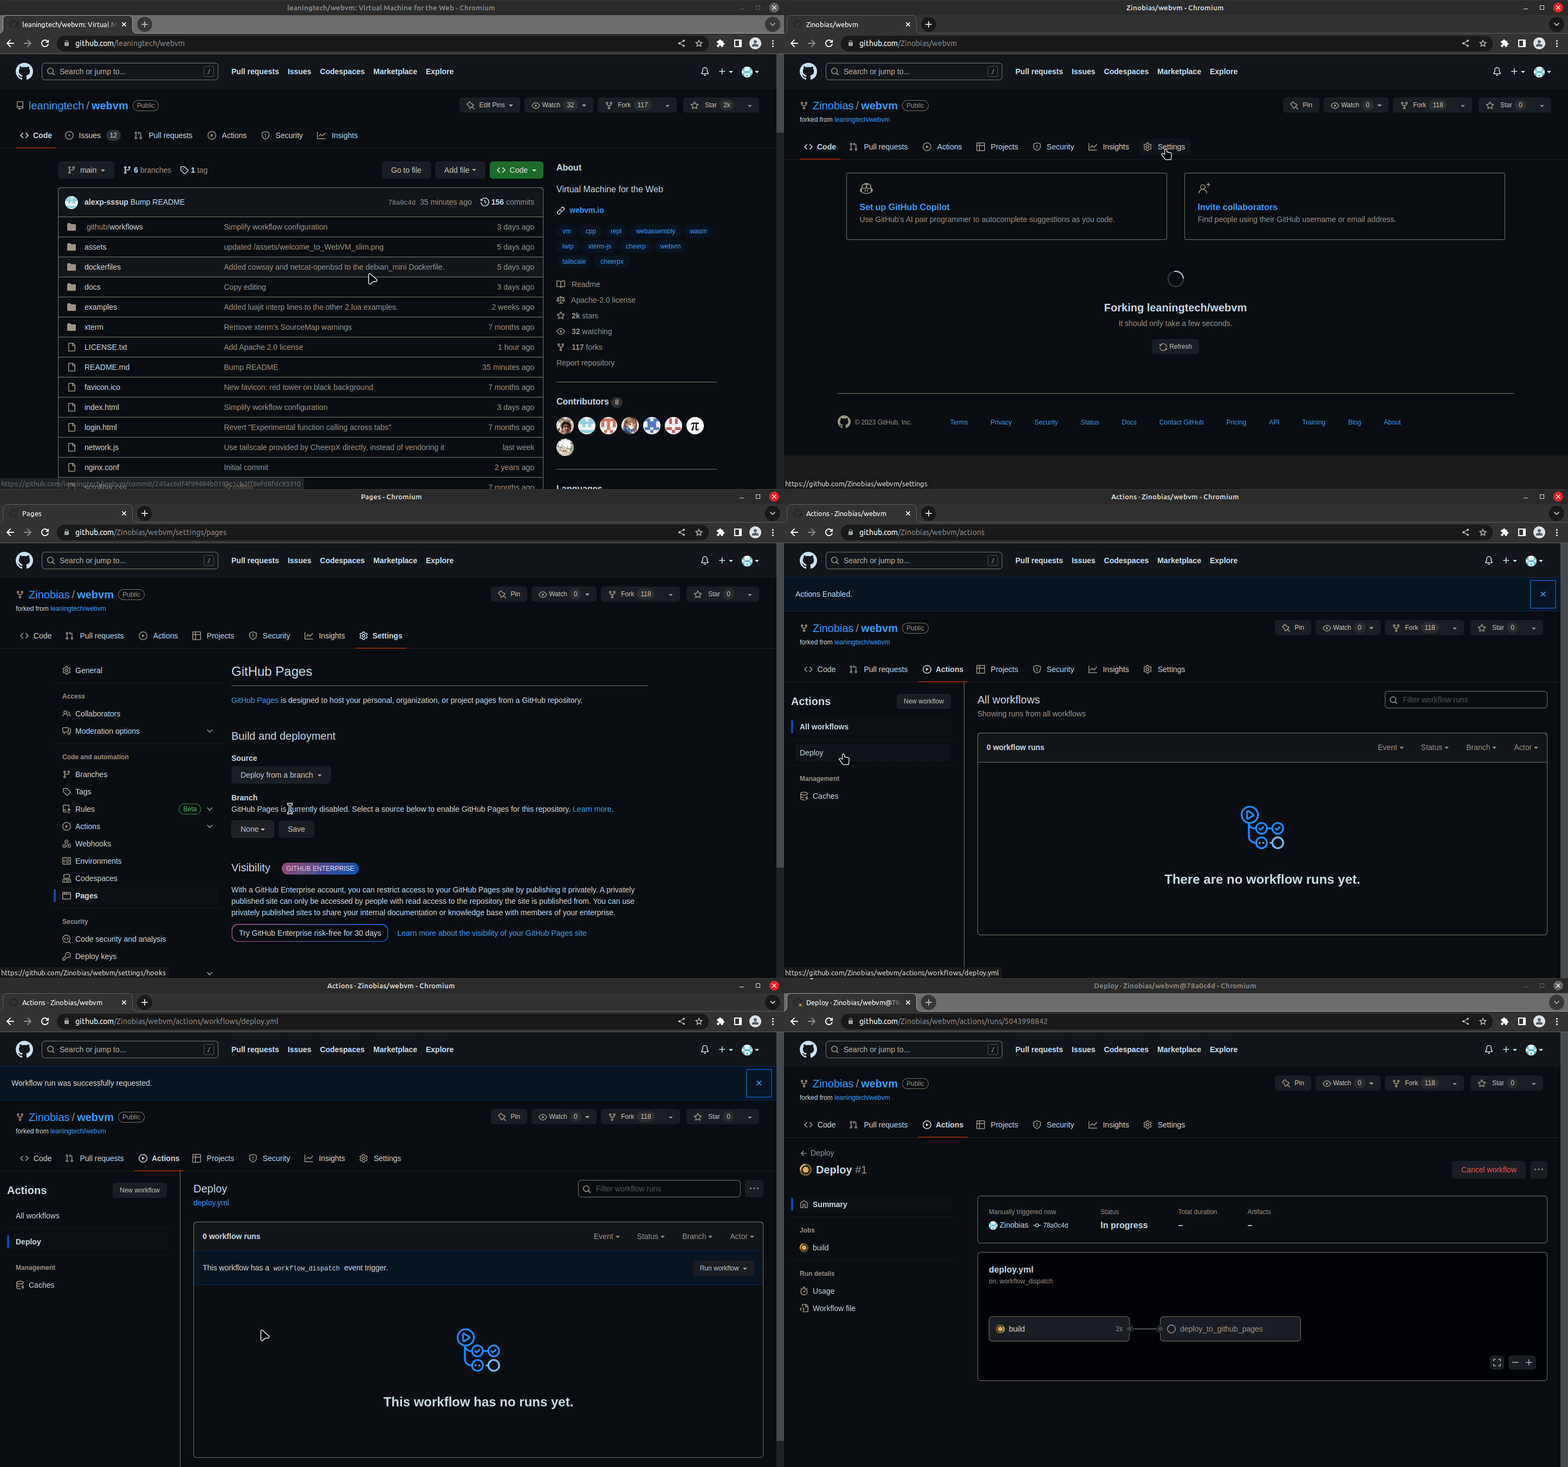
- Fork the repository.
- Enable Github pages in settings.
- Click on
Settings. - Go to the
Pagessection. - Select
Github Actionsas the source.- If you are using a custom domain, ensure
Enforce HTTPSis enabled.
- If you are using a custom domain, ensure
- Click on
- Run the workflow.
- Click on
Actions. - Accept the prompt. This is required only once to enable Actions for your fork.
- Click on the workflow named
Deploy. - Click
Run workflowand then once moreRun workflowin the menu.
- Click on
- After a few seconds a new
Deployworkflow will start, click on it to see details. - After the workflow completes, which takes a few minutes, it will show the URL below the
deploy_to_github_pagesjob.
You can now customize dockerfiles/debian_mini to suit your needs, or make a new Dockerfile from scratch. Use the Path to Dockerfile workflow parameter to select it.
Run WebVM locally with a custom Debian mini disk image
Clone the WebVM Repository
git clone https://github.com/leaningtech/webvm.git
cd webvm
Download the Debian mini Ext2 image
Run the following command to download the Debian mini Ext2 image:
wget "https://github.com/leaningtech/webvm/releases/download/ext2_image/debian_mini_20230519_5022088024.ext2"(*You can also build your own disk image by selecting the "Upload GitHub release" workflow option*)
Update the configuration file
Edit
config_public_terminal.jsto reference your local disk image:
Replace:
"wss://disks.webvm.io/debian_large_20230522_5044875331.ext2"With:
"/disk-images/debian_mini_20230519_5022088024.ext2"(Use an absolute or relative URL pointing to the disk image location.)
Replace
"cloud"with the correct disk image type:"bytes"
Build WebVM
Run the following commands to install dependencies and build WebVM:
npm install
npm run build
The output will be placed in the
builddirectory.Configure Nginx
Create a directory for the disk image:
mkdir disk-images
mv debian_mini_20230519_5022088024.ext2 disk-images/
Modify your
nginx.conffile to serve the disk image. Add the following location block:location /disk-images/ { root .; autoindex on; }
Start Nginx
Run the following command to start Nginx:
nginx -p . -c nginx.confNginx will automatically serve the build directory.
Access WebVM
Open a browser and visit:
http://127.0.0.1:8081.Enjoy your local WebVM!
Example customization: Python3 REPL
The Deploy workflow takes into account the CMD specified in the Dockerfile. To build a REPL you can simply apply this patch and deploy.
diff --git a/dockerfiles/debian_mini b/dockerfiles/debian_mini
index 2878332..1f3103a 100644
--- a/dockerfiles/debian_mini
+++ b/dockerfiles/debian_mini
@@ -15,4 +15,4 @@ WORKDIR /home/user/
 # We set env, as this gets extracted by Webvm. This is optional.
 ENV HOME="/home/user" TERM="xterm" USER="user" SHELL="/bin/bash" EDITOR="vim" LANG="en_US.UTF-8" LC_ALL="C"
 RUN echo 'root:password' | chpasswd
-CMD [ "/bin/bash" ]
+CMD [ "/usr/bin/python3" ]
How to use Claude AI
To access Claude AI, you need an API key. Follow these steps to get started:
- Create an account
- Visit Anthropic Console and sign up with your e-mail. You'll receive a sign in link to the Anthropic Console.
- Get your API key
- Once logged in, navigate to Get API keys.
- Purchase the amount of credits you need. After completing the purchase, you'll be able to generate the key through the API console.
- Log in with your API key
- Navigate to your WebVM and hover over the robot icon. This will show the Claude AI Integration tab. For added convenience, you can click the pin button in the top right corner to keep the tab in place.
- You'll see a prompt where you can insert your Claude API key.
- Insert your key and press enter.
- Start using Claude AI
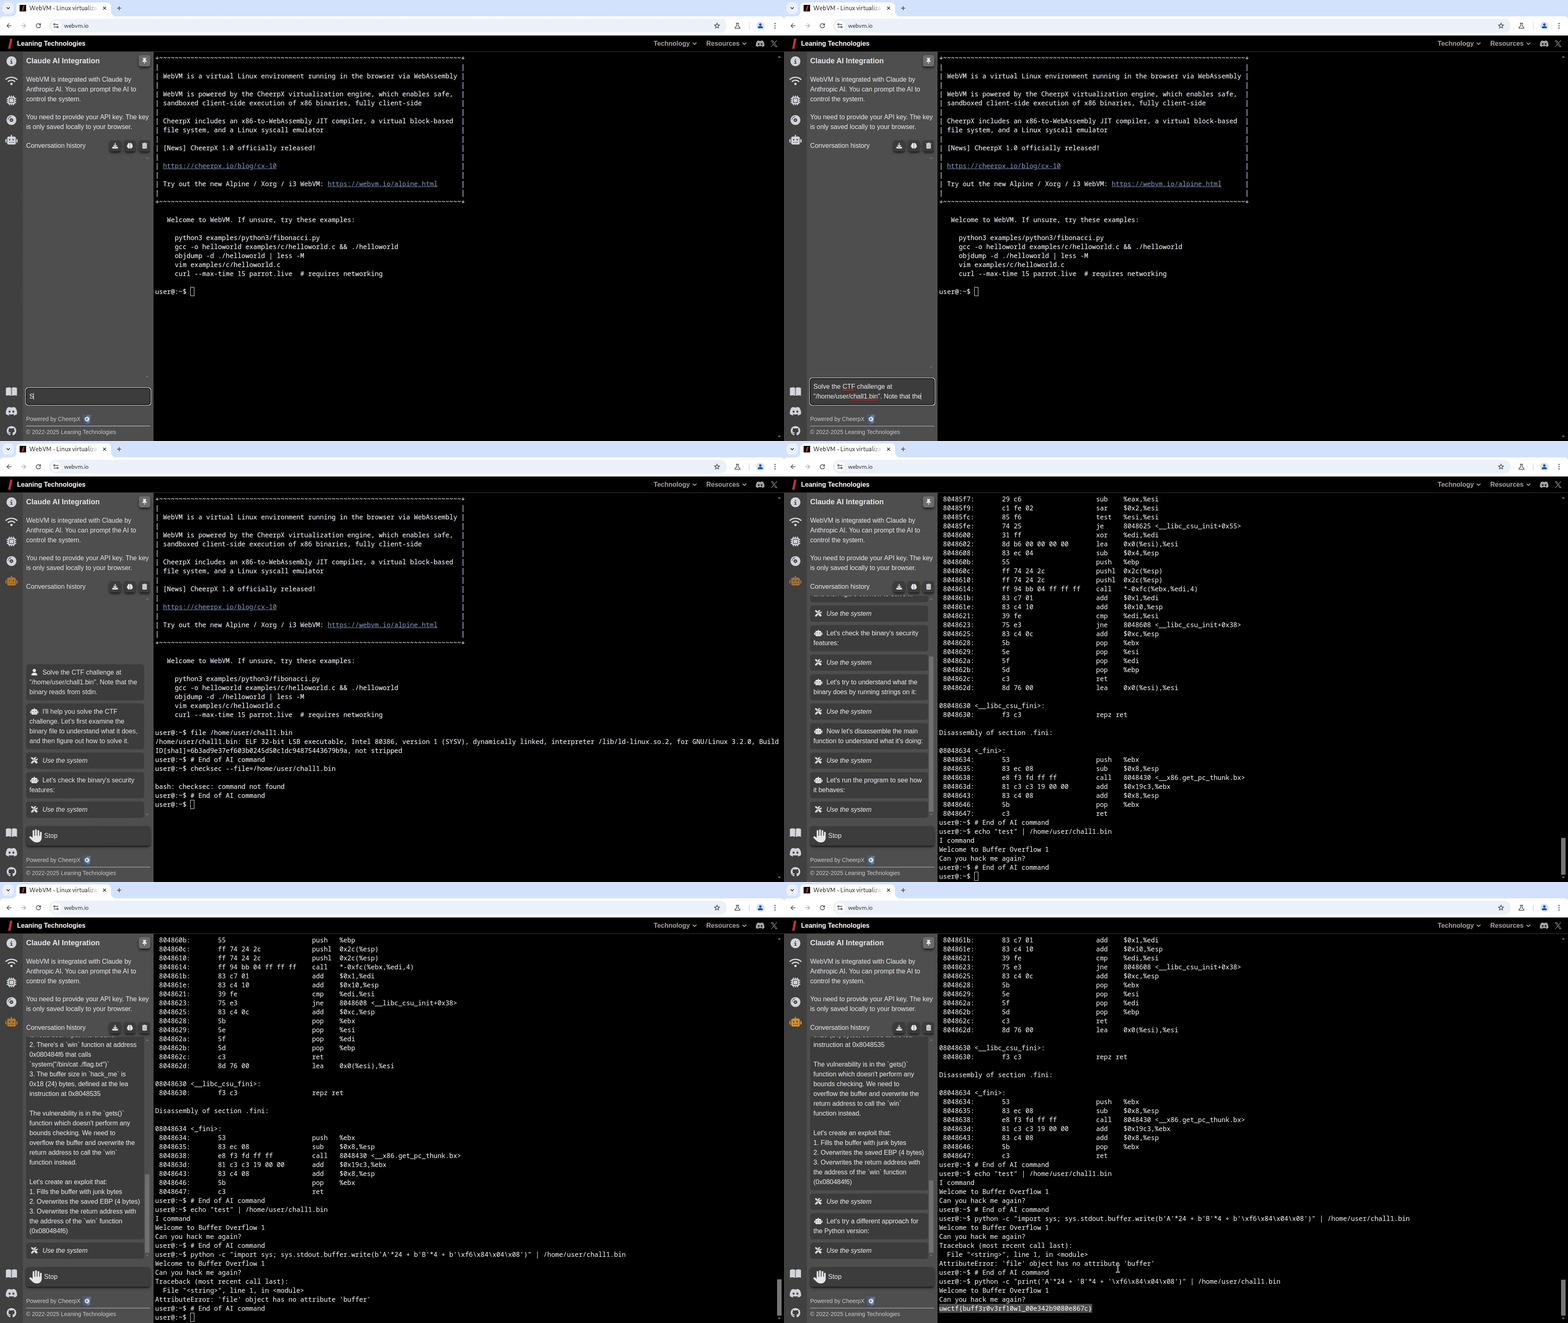
- Once your API key is entered, you can begin interacting with Claude AI by asking questions such as:
"Solve the CTF challenge at /home/user/chall1.bin. Note that the binary reads from stdin."
Important: Your API key is private and should never be shared. We do not have access to your key, which is not only stored locally in your browser.
Bugs and Issues
Please use Issues to report any bug. Or come to say hello / share your feedback on Discord.
More links
- WebVM: server-less x86 virtual machines in the browser
- WebVM: Linux Virtualization in WebAssembly with Full Networking via Tailscale
- Mini.WebVM: Your own Linux box from Dockerfile, virtualized in the browser via WebAssembly
- Reference GitHub Pages deployment: Mini.WebVM
- Crafting the Impossible: X86 Virtualization in the Browser with WebAssembly Talk at JsNation 2022
Thanks to...
This project depends on:
- CheerpX, made by Leaning Technologies for x86 virtualization and Linux emulation
- xterm.js, https://xtermjs.org/, for providing the Web-based terminal emulator
- Tailscale, for the networking component
- lwIP, for the TCP/IP stack, compiled for the Web via Cheerp
Versioning
WebVM depends on the CheerpX x86-to-WebAssembly virtualization technology, which is included in the project via NPM.
The NPM package is updated on every release.
Every build is immutable, if a specific version works well for you today, it will keep working forever.
License
WebVM is released under the Apache License, Version 2.0.
You are welcome to use, modify, and redistribute the contents of this repository.
The public CheerpX deployment is provided as-is and is free to use for technological exploration, testing and use by individuals. Any other use by organizations, including non-profit, academia and the public sector, requires a license. Downloading a CheerpX build for the purpose of hosting it elsewhere is not permitted without a commercial license.
Read more about CheerpX licensing
If you want to build a product on top of CheerpX/WebVM, please get in touch: sales@leaningtech.com


