
docs.md 9.5 KB
page_title: The Documentation page_description: The Docker Index help documentation page_keywords: Docker, docker, index, accounts, plans, Dockerfile, Docker.io, docs, documentation
The Documentation
Docker IO and Docker Index Accounts
You can search for Docker images and pull them from the Docker Index without signing in or even having an account. However,
in order to push images, leave comments or to star a repository, you are going
to need a Docker IO account.
Registration for a Docker IO Account
You can get a Docker IO account by signing up for one here. A valid email address is required to register, which you will need to verify for account activation.
Email activation process
You need to have at least one verified email address to be able to use your Docker IO account. If you can't find the validation email, you can request another by visiting the Resend Email Confirmation page.
Password reset process
If you can't access your account for some reason, you can reset your password from the Password Reset page.
Searching for repositories and images
You can search for all the publicly available repositories and images using
Docker. If a repository is not public (i.e., private), it won't be listed on
the Index search results. To see repository statuses, you can look at your
profile page.
Repositories
Stars
Stars are a way to show that you like a repository. They are also an easy way of bookmark your favorites.
Comments
You can interact with other members of the Docker community and maintainers by leaving comments on repositories. If you find any comments that are not appropriate, you can flag them for the Index admins' review.
Private Docker Repositories
To work with a private repository on the Docker Index, you will need to add one
via the Add Repository link.
Once the private repository is created, you can push and pull images to and
from it using Docker.
Note: You need to be signed in and have access to work with a private repository.
Private repositories are just like public ones. However, it isn't possible to browse them or search their content on the public index. They do not get cached the same way as a public repository either.
It is possible to give access to a private repository to those whom you designate (i.e., collaborators) from its settings page.
From there, you can also switch repository status (public to private, or viceversa). You will need to have an available private repository slot open before you can do such a switch. If you don't have any, you can always upgrade your Docker Index plan.
Collaborators and their role
A collaborator is someone you want to give access to a private repository. Once
designated, they can push and pull. Although, they will not be allowed to
perform any administrative tasks such as deleting the repository or changing its
status from private to public.
Note: A collaborator can not add other collaborators. Only the owner of the repository has administrative access.
Webhooks
You can configure webhooks on the repository settings page. A webhook is called
only after a successful push is made. The webhook calls are HTTP POST requests
with a JSON payload similar to the example shown below.
Note: For testing, you can try an HTTP request tool like requestb.in.
Example webhook JSON payload:
{
   "push_data":{
      "pushed_at":1385141110,
      "images":[
         "imagehash1",
         "imagehash2",
         "imagehash3"
      ],
      "pusher":"username"
   },
   "repository":{
      "status":"Active",
      "description":"my docker repo that does cool things",
      "is_trusted":false,
      "full_description":"This is my full description",
      "repo_url":"https://index.docker.io/u/username/reponame/",
      "owner":"username",
      "is_official":false,
      "is_private":false,
      "name":"reponame",
      "namespace":"username",
      "star_count":1,
      "comment_count":1,
      "date_created":1370174400,
      "dockerfile":"my full dockerfile is listed here",
      "repo_name":"username/reponame"
   }
}
Trusted Builds
Trusted Builds is a special feature allowing you to specify a source
repository with a Dockerfile to be built by the Docker build clusters. The
system will clone your repository and build the Dockerfile using the repository
as the context. The resulting image will then be uploaded to the index and
marked as a Trusted Build.
Trusted Builds have a number of advantages. For example, users of your Trusted Build can be certain that the resulting image was built exactly how it claims to be.
Furthermore, the Dockerfile will be available to anyone browsing your repository on the Index. Another advantage of the Trusted Builds feature is the automated builds. This makes sure that your repository is always up to date.
Linking with a GitHub account
In order to setup a Trusted Build, you need to first link your Docker Index account with a GitHub one. This will allow the Docker Index to see your repositories.
Note: We currently request access for read and write since the Index needs to setup a GitHub service hook. Although nothing else is done with your account, this is how GitHub manages permissions, sorry!
Creating a Trusted Build
You can create a Trusted Build from any of your public GitHub repositories with a Dockerfile.
Note: We currently only support public repositories. To have more than one Docker image from the same GitHub repository, you will need to set up one Trusted Build per Dockerfile, each using a different image name. This rule applies to building multiple branches on the same GitHub repository as well.
GitHub organizations
GitHub organizations appear once your membership to that organization is made public on GitHub. To verify, you can look at the members tab for your organization on GitHub.
GitHub service hooks
You can follow the below steps to configure the GitHub service hooks for your Trusted Build:
| Step | Screenshot | Description |
|---|---|---|
| 1. | 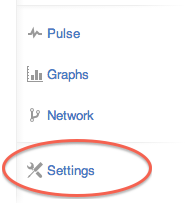 |
Login to Github.com, and visit your Repository page. Click on the repository "Settings" link. You will need admin rights to the repository in order to do this. So if you don't have admin rights, you will need to ask someone who does. |
| 2. | 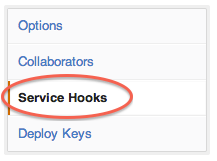 |
Click on the "Service Hooks" link |
| 3. | 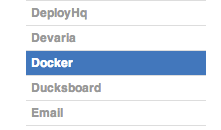 | Find the service hook labeled "Docker" and click on it. |
| 4. | 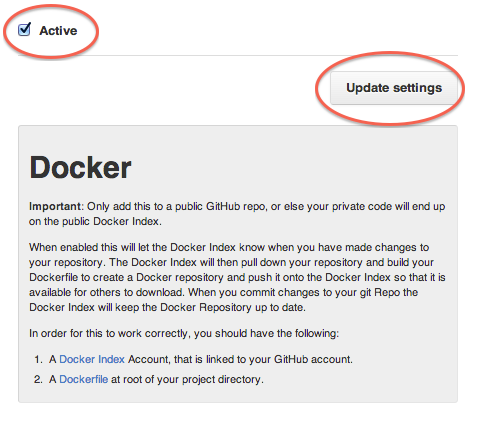 |
Click on the "Active" checkbox and then the "Update settings" button, to save changes. |
The Dockerfile and Trusted Builds
During the build process, we copy the contents of your Dockerfile. We also add it to the Docker Index for the Docker community to see on the repository page.
README.md
If you have a README.md file in your repository, we will use that as the
repository's full description.
Warning: If you change the full description after a build, it will be rewritten the next time the Trusted Build has been built. To make changes, modify the README.md from the Git repository. We will look for a README.md in the same directory as your Dockerfile.
Build triggers
If you need another way to trigger your Trusted Builds outside of GitHub, you can setup a build trigger. When you turn on the build trigger for a Trusted Build, it will give you a URL to which you can send POST requests. This will trigger the Trusted Build process, which is similar to GitHub webhooks.
Note: You can only trigger one build at a time and no more than one every five minutes. If you have a build already pending, or if you already recently submitted a build request, those requests will be ignored. You can find the logs of last 10 triggers on the settings page to verify if everything is working correctly.
Repository links
Repository links are a way to associate one Trusted Build with another. If one gets updated, linking system also triggers a build for the other Trusted Build. This makes it easy to keep your Trusted Builds up to date.
To add a link, go to the settings page of a Trusted Build and click on Repository Links. Then enter the name of the repository that you want have linked.
Warning: You can add more than one repository link, however, you should be very careful. Creating a two way relationship between Trusted Builds will cause a never ending build loop.